One of the fundamental ideas behind HTML is that the creator of a page can use tags to identify the purpose of text elements, but final formatting is handled by the browser. This is mainly due to the fact that the page must be viewable by different browsers running on different type of machines and operating systems. In addition, this approach allows for the individual user to customize the way pages are displayed on their personal browser. For example, it is a simple task to increase or decrease the size of text fonts in the page (under the "View" menu).
Other viewing preferences, such as default fonts and colors and the default home page, can be customized by the user. Using Netscape, select "Preferences" under the "Edit" menu to see all of the possible options. Using IE, select "Internet options" under the "Tools" menu.
EXERCISE 4.12: If you are working on a private computer, customize the browser to fit your personal preferences. Note: do not change any preferences if you are at a publicly accessible computer -- don't impose your preferences on others!
So far, all of the examples of dynamic page content have come from stand-alone JavaScript write statements. That is, to generate a message based on user input, the entire message was displayed using a write statement. As you may recall, whatever output is produced by a write statement within SCRIPT tags is embedded into the Web page as if it had been typed directly. Thus, it is possible to display a single word or phrase in a page, embedded within the static text. For example:
|
|
The advantage of this particular approach is that you can minimize the amount of dynamic evaluation going on within the page. If you want the user's name to appear several times within your page, you can write the static content of the page and then insert the name using a write statement at each occurrence.
EXERCISE 4.13: Modify your home page so that it first prompts the user for their name, then uses that name at several places within the page. Use SCRIPT tags at the top of the BODY to read in the user's name, then separate SCRIPT tags for each occurrence.
As we have seen, JavaScript write statements can be used to display messages enclosed in quotes (also known as strings). In fact, either single quotes or double quotes can be used to enclose a string. Thus, either of the following JavaScript write statements could be used to display a simple message:
The ability to use either type of quotation mark simplifies the display of messages that contain quotes. For example, if you wish to display a message that contains a single quote (or apostrophe), enclose the message in double quotes. Similarly, if your message is to contain double quotation marks, enclose the message in single quotes. In the case of deeply nested quotes (e.g., quotes within quotes within quotes), a single quote can be represented as \' and double quote as \".Using this backslash notation, it doesn't matter what type of quotation marks enclose the string, since the backslash properly identifies the nested character.
For example, the following write statement would produce the same output:
EXERCISE 4.14: What error(s) occur when a JavaScript string incorrectly nests quotation marks? For example:document.write("The page said "Hello world." at the top");
EXERCISE 4.15: Write JavaScript write statements that produce the following lines of output.The announcer screamed "Cubs win! Cubs win!" The oath began as "I, 'state your name' swear to uphold..." The oath began as "I, "state your name" swear to uphold..."
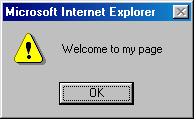
Recall that the predefined prompt function can be called within SCRIPT tags to obtain input from the user. When prompt is called, a dialog box is opened on the screen in which the user can enter text, and that text is then returned when the user clicks the OK button. There is a closely related JavaScript function, alert, that can similarly be called when the user needs to be alerted, but no input is required. When the alert function is called, an alert box appears in a new window displaying whatever message was specified in the call. Unlike a dialog box, however, there is no space for the user to enter input. After reading the message, they simply click on the OK button to close the alert box.
For example, the code on the left, when embedded in the body of a Web page, would cause the alert box on the right to appear:
|
|
|
Alert boxes, while easy to create, are generally rather annoying to the user. Using a write statement, the above message could have been embedded in the page instead of appearing in a separate box that requires a button click to close. Later in the text, we will make use of alert boxes as a means of warning the user when something has gone wrong (e.g., an input value is in the wrong format). For now, there is one particular application where alert boxes can be useful.
In the Web page below, the BODY tag has a new attribute, named ONUNLOAD. This attribute specifies code that will be executed when the user leaves this page, either by hitting the back button, clicking on a link, or entering a new address in the Address box. In this case, a call is made to the alert function so that the message "Thanks for visiting!" is displayed when the user leaves the page.
|
|
EXERCISE 4.16: If desired, add a similar feature to your home page so that the user receives a farewell message when leaving your page. Be warned that many users find such farewells annoying, as they require action (closing the alert box) on the part of the user just to leave your page.