|
|
The most widespread and visible aspect of computing today is probably the World Wide Web. Initially designed as a way for researchers to share documents over the Internet, the Web has evolved into a dynamic, explosive medium for communication and commerce. Using a program called a Web browser, it is possible to access documents (commonly referred to as Web pages) from around the world at the click of a mouse. In addition, the Web provides an easy-to-use interface for advertising and online business transactions, as evidenced by the abundance of corporate Web addresses in television and print ads.
In this chapter, you will learn the basics of the Web and its underlying language, HTML. You will develop your own Web page, adding new features incrementally as you learn. In the end, you will be able to join the Web community by displaying your Web page to the world.
A Web page is a text document that contains additional formatting information in a language called HTML (HyperText Markup Language). Through HTML, it is possible to identify the contents of a page by category, such as a section heading, a centered paragraph, or an image to be displayed. This content information is then interpreted by a Web browser, which formats the page contents appropriately.
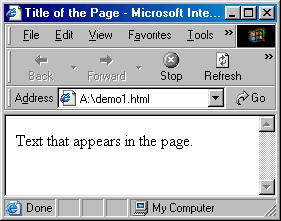
HTML specifies formatting within a page using tags. In its simplest form, a tag is a word or symbol embedded inside <>. For example, every HTML document must begin with the tag <html> and end with the tag </html>. These tags specify that the enclosed text may contain HTML formatting information, and so should be interpreted by the Web browser accordingly. Inside the HTML tags, there should also be a HEAD section (delimted by <head> and </head>) and a BODY section (delimited by <body> and </body>). For example, the HTML document on the left would be displayed as the Web page on the right.
|

|
The HEAD section contains the title for the page, delimited by the tags <title> and </title>. This text is displayed in the title bar at the top of the browser window. In this example, the title is "Title of the Page".
The BODY section contains the actual text that will appear in the page. In this example, the text is simply "Text that appears in the page." However, the contents of the page can be arbitrarily large and may contain additional HTML tags (see examples below).
The text contained within <!-- and --> is known as a comment and is ignored by the browser. The purpose of comments is to provide information about the page, such as its author, last modification date, or general purpose. While comments are not displayed in the browser, they may be seen by anyone reviewing the HTML text. You should always place a sequence of comments at the top of any HTML document you create, identifying the file name, author, and purpose of the page.
EXERCISE 2.1: Create a simple home page for yourself using a text editor (see Appendix A for instructions with common PC-based editors). Your page should have a title, such as "Dave's Home Page", and should contain some basic information about you. Save your page to a disk under the name index.html.
You may have found that when you displayed your home page, it didn't appear in the page exactly as you typed it. This is inevitable since the size of the browser window in which the text is displayed may vary. The length of the lines you typed may be too long to fit in the window, or might instead leave wasted white space at the end. To ensure that your text looks attractive in any sized window, the browser automatically adjusts the lines of text to fit the current window, wrapping text to the next line as needed. You may have also noted that when the browser does this automatic formatting, it ignores any blank lines and extra spaces and tabs in your text. When displayed in the browser, consecutive spaces, tabs, or blank lines will appear as a single space.
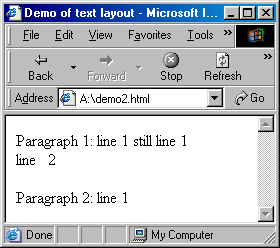
It is possible to control some of the spacing of text in the Web page using additional HTML tags. The tags
and
identify a paragraph. Text enclosed within <p> </p> will be displayed starting on a new line, preceded by a blank line. If you wish to explicitly break text without inserting a blank line, a line can be broken by placing a <br /> tag in the text. Text that follows a <br /> tag will be displayed starting on a new line. (Note: by convention, tags such as <br /> that do not have a corresponding closing tag end with '/>'.) In addition, if you really want to force consecutive spaces in the text, you can do so by inserting the special keyword which represents a non-breaking space. Each occurrence of will be displayed as a space, no matter where it appears in the text. For example,
|
|
EXERCISE 2.2: Add additional paragraphs to your home page. If you are having trouble thinking of things to write about yourself, consider a paragraph of biographical data, another on your hobbies, and another listing some favorite books or movies. Use <p></p>, <br />, and appropriately to make your page readable and attractive.
It is important to note that HTML tags are embdedded in the text they are intended to format. If you enter a malformed tag, omitting either the opening ‘<’ or closing ‘>’, the tag will not be recognized as HTML and will be displayed as plain text within the page. A well-formed tag whose name is misspelled will generally be ignored by the browser. For example, if you mistakenly type <bl /> instead of the intended <br />, the tag will be ignored and nothing will appear in its place in the page. |
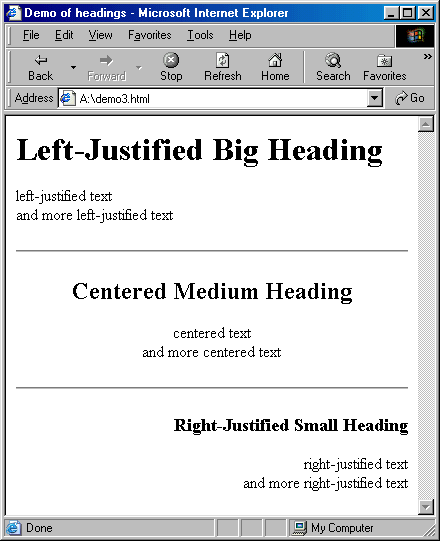
In a large document, it is often useful to divide the text into sections, each with a heading describing the content that follows. HTML has special heading tags for just this purpose. Text enclosed between the tags <h1> and </h1> is displayed in large, bold letters above the text that follows it. Similarly, the tags <h2> and </h2> can be used to display a heading using slightly smaller letters, <h3> and </h3> for even smaller letters, and so on down to <h6> and </h6>. Furthermore, it is possible to separate sections with a horizontal line using the <hr /> tag (where HR stands for horizontal rule).
By default, all text in a Web page is displayed left-justified on the page. That is, each heading or paragraph begins at the left edge of the page. It is possible to align text so that it is centered or even right-justified using a STYLE attribute in an opening tag. For example, the opening tag
|
|
EXERCISE 2.3: Divide your home page into sections. Use a large heading, e.g. H1, to list your name, centered on the top of the page and with a horizontal line below it. For each of the text sections, use a smaller heading, e.g. H2 or H3. At least one section of your page should contain multiple paragraphs.
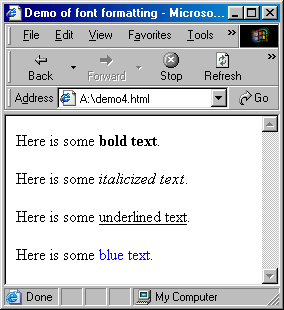
In printing terminology, a font defines a particular typeface (e.g., Times Roman, Courier, Arial) and size (e.g., 11 pt., 12 pt.) used to display characters in a document. With respect to Web pages, the creator of a page has limited control over the fonts used to display the page. Web browsers allow the user to specify his or her own preferences for fonts, selecting default fonts for viewing pages, so one browser may display a page very differently from another. There is some font formatting that can be forced in a page, however. Text enclosed in the tags <b></b> will appear in bold, <i></i> in italics, and <u></u> underlined. In addition, you can change the color of text by enclosing it in SPAN tags with an appropriate STYLE attribute.
|
|
EXERCISE 2.4: Augment your home page using font formatting where appropriate.
When HTML tags such as <b> and </b> are used to sourround text, they provide context and meaning to that text. In this case, these tags specify that the surrounded text is to be displayed in a bold font, and so stand out from other text in the page. Text surrounded by tags is known as an element, since such elements are the building blocks of HTML documents. Thus, <b>this</b> may be referred to as a bold element, while <i>that</i> is an italics element. If you wish to apply more than one format to a piece of text, elements may be nested inside each other, such as <b><i>bold and italics</i></b> .
When defining HTML elements with opening and closing tags, it is important to specify both tags in the correct order. If you forget or misspell the opening tag of an element, the closing tag will be ignored and no formatting will occur. If you specify the opening tag but forget or misspell the closing tag, the formatting will continue throughout the document. For example, a common mistake is to forget the ‘/’ in a closing tag, in effect specifying two opening tags: <b>oops<b>. This will result in the rest of the document appearing in bold. When nesting HTML elements, be sure to specify the closing tags in the opposite order as they were opened. Misordering tags in a nested element, s uch as <b><i>oops</b></i>, is technically incorrect although some browsers will display the text correctly anyway. |
While it is always possible to access a Web page by entering its URL into the Address box in the browser, most pages on the Web are not accessed this way. The defining feature of the Web is its ability to link pages together through hyperlinks. A hyperlink is an element on a Web page, usually displayed as underlined text, that connects the page to another page or online resource. When a hyperlink is clicked, the browser loads the connected page, regardless of its physical location on the Web. Thus, by following a chain of hyperlinks, a user may explore related documents, which may be stored on computers thousands of miles apart. Text that contains embedded hyperlinks is referred to as hypertext.
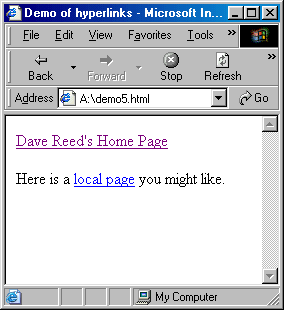
When inserting a hyperlink into a document, the URL of the connected page and the text to appear in the hyperlink are specified using the tags <a> and </a> (where A is short for anchor, signifying that the hyperlink connects or anchors separate documents together). An <a> tag has an attribute named HREF (short for Hypertext REFerence) that is set to be the URL of the page to be linked. For example,
|
|
In the first anchor above, the HREF attribute is set to be the URL of the author's home page. By clicking on the link labeled "Dave Reed's Home Page", the browser will access this page and display it in the browser window. Note that in the second anchor, the URL does not begin with the http:// prefix. The absence of http:// in the URL signifies that the document does not need to be accessed via the Internet but is instead stored locally (in the same directory or folder as the current page). Also note that in the displayed Web page, the links appear in different colors. By default, a Web browser will display a link that has been previously visited in one color (usually purple) and an unvisited link in another color (usually blue).
EXERCISE 2.5: Add a section to your home page containing at least five hyperlinks to useful and/or interesting sites. Make sure that these hyperlinks work correctly by clicking on them and viewing the linked pages.
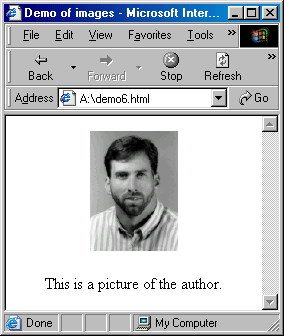
In addition to hyperlinks, Web pages allow for a wide variety of content. The term multimedia is often used to refer to systems that allow for the integration of various communication media, such as text, images, movies, and sound clips. In HTML, images are loaded into a page using an <img/> tag. (Note the '/>' at the end of the tag, signifying that there is no corresponding closing tag.) Standard browsers are automatically able to display images in GIF (Graphics Interchange Format) and JPEG (Joint Photographic Experts Group) formats, the most common formats for storing digital images. For other types of image formats, the browser may require special purpose extensions called plug-ins.
For example,
|
|
The URL of the image file is specified using the SRC attribute of the IMG tag, where SRC is short for source. Again, the fact that the URL does not start with http:// signifies that the image is stored locally. To access images over the Internet, the URL of the image would start with http:// and contain the appropriate server name and directory path. The ALT attribute, while not required, is useful for images. The message specified by the ALT attribute provides alternate text that appears in the page if the image fails to load or if the particular browser is unable to display the image (e.g., a text-to-speech browser for the visually-impaired). In addition, some browsers will display the ALT text when the mouse moves over the image, providing additional context for the image.
EXERCISE 2.6: Copy some image from the Web to your local directory. This can be accomplished by clicking the right mouse button over the desired image, then selecting Save Image from the resulting menu. Save the image in the same directory as "index.html", then incorporate the local image into your home page.
In order to make your page accessible over the Web, it must be stored on a Web server in a publicly accessible directory. In addition to the HTML document itself, any supporting documents (e.g., supplementary files or images) must also be publicly accessible and so should be stored with that page. The steps involved in uploading your page and supporting documents to a Web server are described in Appendix A.
EXERCISE 2.7: Copy both your home page and downloaded image file to your local Web server.
Most Web pages refer to other elements that are not contained within the page. For example, a page might contain images or links to other Web pages whose source files are stored locally. Whenever you move the page from one directory or folder to another, you must be sure to move the supporting documents along with it. If the browser is unable to locate an image file in the expected location, a blank image will appear (with an X in it) and any alternate text specified using the ALT attribute will be displayed. If a supporting HTML document cannot be found, then a default screen with an error message will appear when the link is clicked. |
| Supplemental (optional) material and exercises |